Performance and Availability Issues when Using Linux Hosting for WordPress on GoDaddy

Change Domain on cPanel Hosting page

I have used GoDaddy for hosting this blog for several years now, and I can say that I have not always been happy about it. I have used a free service called Monitor.Us to let me know when the website was down, and until recently, it was down quite a lot more than I thought it should be. Also, it seemed slower than I thought it should be much of the time.

I began looking at other possibilities for hosting, partially because GoDaddy doesn’t have the greatest reputation for WordPress website performance, despite their generally positive reviews regarding domain registration. I looked at BlueHost and HostGator, both of whom get better reviews than GoDaddy for WordPress hosting.

I wondered about the difficulty of moving my site when I realized I had another option: using cPanel at GoDaddy. This is the standard for Linux Web Hosting there now – I think the “classic” hosting I had been using is not even available any longer for new websites.

I had heard good things about cPanel; in fact, one of my friends here in Houston works there and had told me about their implementation at GoDaddy. I called GoDaddy support, and the person I talked to set up a new cPanel site for me. Given a few simple instructions, I was able to import my old WordPress site into the cPanel site.

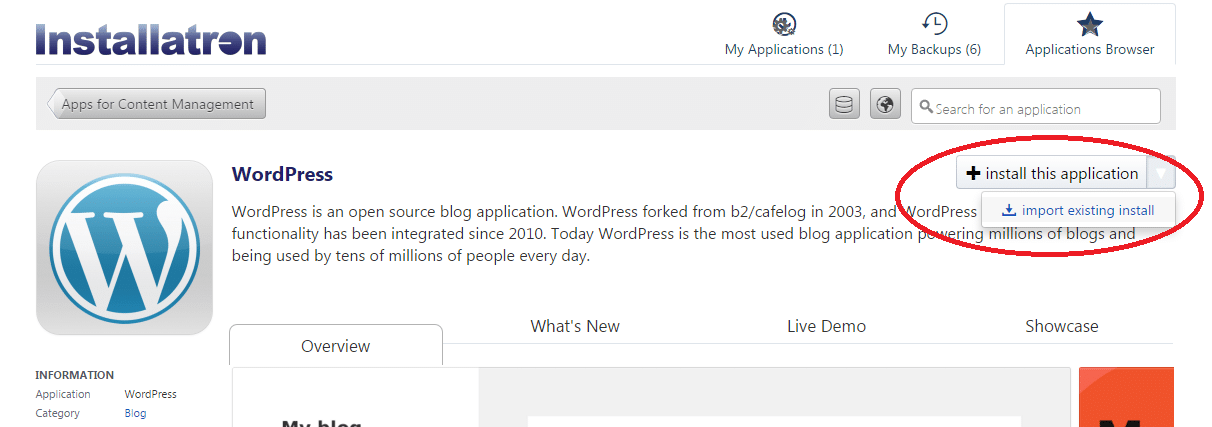
If you’re using the base domain as I am (like example.com), you will set up a subdomain like new.example.com, and import your old WP site into the new site using the import screen shown below. Use your old domain name, choose the FTP option, and your FTP username and password on the next screen to import from your old account. Note: You may want to first log into the admin section of your old WP site to make sure you are on the newest version of WP.

import existing WP install
Select WordPress from the cPanel Hosting screen to get here.

If you need allow_url_fopen in your site, this will need to be added to your php.ini file. It worked automatically in the old hosting environment.

allow_url_fopen = on

After you’re sure that your new site works properly, you will delete the old site through the GoDaddy hosting interface.

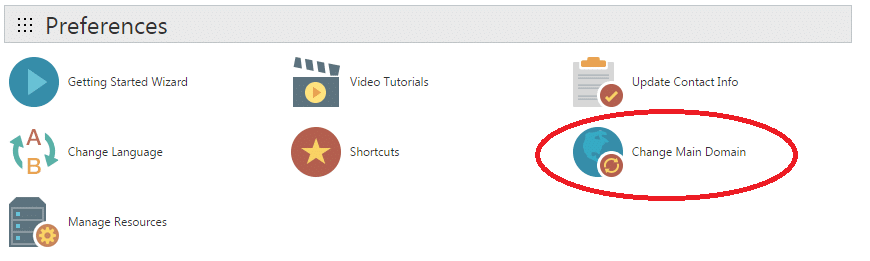
Once that’s complete, you can change your new subdomain back to the base domain in the Preferences section of the cPanel Hosting page.

Change Domain on cPanel Hosting page
Change Domain in Preferences section on cPanel Hosting page

Any URL references to your site may need to be manually corrected in the Widgets section of your WP site to point at the correct domain.

If media in your existing posts aren’t showing up, a SQL script similar to the one below should be run against the MySQL database that your site uses.
For further details, look at the source where I found this gem. (If you’ve changed the “wp_” prefix on your tables, adjust accordingly.)

UPDATE wp_options SET option_value = replace(option_value, 'http://www.oldurl', 'http://www.newurl') WHERE option_name = 'home' OR option_name = 'siteurl';
UPDATE wp_posts SET guid = replace(guid, 'http://www.oldurl','http://www.newurl');
UPDATE wp_posts SET post_content = replace(post_content, 'http://www.oldurl', 'http://www.newurl');
UPDATE wp_postmeta SET meta_value = replace(meta_value,'http://www.oldurl','http://www.newurl');

Inside the WordPress admin Dashboard, you can correct any broken links using the Broken Link Checker plugin.

And that’s it. I’ve found that for the same price I was paying before, I get better performance, more uptime (no downtime since the migration yet!), and a better hosting interface.

TL;DR: If you’re already using GoDaddy for Linux Web hosting, instead of going elsewhere, first consider switching to cPanel at GoDaddy for better performance and availability!

Adding the Property Attribute to Style Sheet Declarations in WordPress for HTML5 Validation

HTML5 validator error

Of all the blogging platforms I’ve tried, WordPress is my favorite. If it is self-hosted, it is easy to customize.

One of the pitfalls of customization, however, is how easy it can be for a plugin of dubious quality to wreak havoc on your site. One of the problems I have had is that while WordPress does an excellent job at rendering valid HTML5 code, it is not difficult at all for a plugin to cause validation errors, even as a result of calling built-in WP functions.

In this case, a style sheet declaration was being triggered by a plugin using WP’s wp_register_style function. This function and the wp_enqueue_style function end up using the WP_Styles class, which is found in the /wp-includes/class.wp-styles.php file.

This class is called by WordPress and themes to insert link tags in the head section of your page. However, a plugin or theme can use the functions mentioned above to declare a CSS file anywhere on the page, inside or outside the head section.

This is not inherently problematic in that the page will be rendered normally. However, if the link tag is declared in the body of the HTML document rather than the head (as it happened in my case), the HTML5 code will not correctly validate if no property tag is present.

HTML5 validator error
No property attribute in a link tag not in the head? It won’t validate.

This line of code looks like it comes from a plugin, specifically the Comments Evolved (formerly known as “Google+ Comments for WordPress”) plugin. However, it is not – a little hacking on WordPress is in order here. Also, I’m going to report this as an issue so that the fix may be included in the next update.

If you open the file /wp-includes/class.wp-styles.php and add “property=’stylesheet'” to two lines (93 and 103 in my editor) as below, you shouldn’t see this problem again.

		$tag = apply_filters( 'style_loader_tag', "<link rel='$rel' property='stylesheet' id='$handle-css' $title href='$href' type='text/css' media='$media' />\n", $handle, $href );
		if ( 'rtl' === $this->text_direction && isset($obj->extra['rtl']) && $obj->extra['rtl'] ) {
			if ( is_bool( $obj->extra['rtl'] ) || 'replace' === $obj->extra['rtl'] ) {
				$suffix = isset( $obj->extra['suffix'] ) ? $obj->extra['suffix'] : '';
				$rtl_href = str_replace( "{$suffix}.css", "-rtl{$suffix}.css", $this->_css_href( $obj->src , $ver, "$handle-rtl" ));
			} else {
				$rtl_href = $this->_css_href( $obj->extra['rtl'], $ver, "$handle-rtl" );
			}

			/** This filter is documented in wp-includes/class.wp-styles.php */
			$rtl_tag = apply_filters( 'style_loader_tag', "<link rel='$rel' property='stylesheet' id='$handle-rtl-css' $title href='$rtl_href' type='text/css' media='$media' />\n", $handle, $rtl_href );

			if ( $obj->extra['rtl'] === 'replace' ) {
				$tag = $rtl_tag;
			} else {
				$tag .= $rtl_tag;
			}
		}

This will not fix any plugins or themes that use another mechanism to declare style sheets outside the head, but it has fixed several errors caused by plugins.

Using PHP to Scrape the Report Card from a Code School Profile – Part 2

CodeSchool logo

Earlier this week, I described how to use PHP to scrape the report card from a Code School profile. Now, it must be displayed. I chose to display mine in the sidebar of my blog. To do this, jQuery and CSS will be your friends. It’s pretty simple, and this isn’t the only way to do it. However, in this implementation, it is important that the name of the querystring parameter used in the PHP script (in this case, “nick”) matches the one in the jQuery function call below. Likewise, the id attribute of the div element must also match the one in the jQuery statement.

(Update: the CSS code below should be updated in accordance with this change to prevent bullets from appearing between the badges in the “Master Status” section.)

<style>
#codeschool {
   text-align: center;
   vertical-align: middle;
}

.badge-img {
   display:block !important;
   margin-left: auto;
   margin-right: auto;
}

.pr-avatar {
   display:block;
   margin-left: auto;
   margin-right: auto;
   margin-bottom: 10px;
}
</style>
<div id="codeschool">
</div>
<br />
<script>
(function($) {
$("#codeschool").load("/codeschool/codeschool.php?nick=DeepInTheCode");
})(jQuery);
</script>

Well, that’s it. If you debug the client-side code on both your page and the Code School profile page, you’ll see that there are path elements in the Code School script that cause the partial opacity on uncompleted paths. This is presumably done with other JavaScripts and CSS on the Code School site. I haven’t tried bringing that functionality here as yet. Perhaps for another time…